Paul Nicklen is a National Geographic contributing photographer who grew up in the far northern reaches of Canada, living in tiny settlements mostly populated by Inuit people. From them he learned how to survive in the bitterly cold environment (summer is less than a month long), and a respect and admiration for the creatures that live in those conditions. His love for the hostile but fragile polar ecosystems led him to document them in order to raise awareness of the threat they face from global warming.
Polar Obsession is an enormous, glossy, coffee table book (too large to read comfortably in bed with one’s husband!) full of beautiful photographs of polar bears, sea birds, seals, whales, wolves, reindeer, penguins, krill, and the polar landscapes.
Nicklen ventures into the freezing (-1.5 degrees celcius) water, and swims under the ice to capture the activity of the creatures who spend time there. Many planktonic creatures – amphipods, copepods and krill – congregate under the ice, and are devoured by whales and various fish such as Arctic cod. His photographs bear out the fact that he has exercised profound patience in order to capture the particular moments and interactions – a lot of his job is waiting for everything to be in the right state: light, weather, and the animal itself.
Nicklen’s stories about how he took some of the photographs are wonderful and often hilarious. This little video describes one of the stories and photo series in the book: an interaction Nicklen had with a female leopard seal.
There are is another video on YouTube about the book here, and you can see some more of Nicklen’s polar photos here and here. For those who are interested in the technicalities of this kind of work, Nicklen lists his camera gear and the supplies he would require for a photographic expedition in the far north or south. He often wears a drysuit even when working on the ice, because he has fallen through the ice more than once, and a drysuit dramatically improves his chances of survival.
This is a magnificent book – one of my friends, who has a special fondness for polar bears, is getting it for Christmas! It made me want to visit South Georgia Island and the Antarctic particularly much.
You can purchase a copy of the book here if you’re in South Africa, and here if you’re not.
The camera I use most often is a Bonica Snapper HDDV 1080. It took me a while to come to terms with the camera (keeping it steady) but the camera is amazing and the picture quality is exceptional.
The dome port before modification
I have long been a fan of over/under or split shots but have had very little success with any of the cameras I have owned. This has been due to the lack of a dome port. I decided I would fit a dome port to the Bonica using one that I had purchased some years ago but never got to use due to the theft of the housing it was purchased for.
The housing with the wide angle lens attached
Using the Bonica wide angle lens I had the outer edge of the lens machined with a thread.
Wide angle lens with the adaptor screwed onThe adaptor screwed into the dome port
I then had the mounting tube for the dome port removed (it screws out) and had a boss turned with the same outer thread as the dome port mounting tube on the outside and the inside was machined with a thread matching the one on the outside of the wide angle lens.
The adaptor to connect wide angle lens and dome port
The machining was done by Brian Murray, a regular at False Bay Underwater Club who is brilliant at precision tasks like this one (although I had to beg him to do it – he doesn’t like working on camera gear)!
The wide angle lens screwed into the dome port
The wide angle lens now screws into the adaptor which in turn screws into the dome port. Each step is sealed with a O ring to keep the water out.
Top to bottom: wide angle lens, machined adaptor, dome port, lens hood
Due to the weight of the dome port I decided on a small support bracket underneath as I was concerned the dome port, if bumped, could snap off the nose of the housing. The support screws into the same mounting hole for the video light arm.
In a previous post I revealed that my camera sometimes has a mind of its own. My camera also occasionally takes pictures of its own while I’m underwater. In the background of this next photo you can see some juvenile maasbanker, swarming around me and Tony.
Accidental underwater photo at Long Beach
In the photo above, that’s the end of my weight belt intruding on the right, and my leg (I think) on the left. In the photo below, it’s one of the chest straps of my BCD that has seized the moment for fame.
Another underwater accident
Sometimes the underwater results are a bit vertiginous, like this shot of the sand (with my camera lanyard intruding on the right).
Sand shot
In general, however, I find the above-water accidental photos far more interesting. More to follow…
If you’ve ever driven to Simon’s Town along the False Bay coastal road, you’ll have passed the wreck of the SS Clan Stuart on your left. The engine block sticks out of the water at low tide, and only the highest spring tides come close to covering it. The steamer ran aground during a summer gale in late 1914 after dragging her anchor. She was carrying a cargo of coal, all of which was salvaged I think.
Tony getting the gear ready before the dive
The site is quite exposed, and will never boast 20 metre visibility, but on a good day with a calm sea, low swell and the correct prevailing wind direction you can be very lucky (as we were)! The entry is quite hard work. The one we usually use is to park on the roadside outside the old oil refinery and naval graveyard, and kit up there. Walk across the road, climb the low brick wall and find a route down the dunes to the railway line. Take care as the railway line is now in use. Cross the tracks and use the large cement walkway/staircase to get down to the beach. The last step is high – I found it easier to go left over the big boulders on the way down, but on the way up this is too difficult.
Iron ribs
Scattered wreckage
Broken decking
The interior of the hull
The hull viewed from outside
Scattered wreckage of the Clan Stuart
The engine block
Tony films fish under the boiler (his light on the right)
Inside the hull
The ribs of the hull
A bollard
View down the inside of the wreck
Once on the beach, you can walk to opposite the engine block. The wreck runs nearly parallel with the shore about 40 metres in each direction from the engine block, so you’ll actually hit it almost certainly, wherever you get in. Watch out for the wave on the beach – sometimes it looks small, but with scuba kit on your back you’re heavy and unstable and in a big swell you can get nicely tumbled. Make sure your BCD is inflated before you brave the breakers – you might even want to go so far as to put your regulator in your mouth before you set out. As soon as you are through the waves, put your fins on and swim out into deeper water away from the surf zone. Don’t mess around here – it can spoil (or prematurely terminate) your dive!
Onefin electric ray
The Clan Stuart was made of iron, and although she’s very broken up, much of her remains. The remains of boilers can be seen next to the engine block, and the ribs of the ship are clearly visible as you swim along her length. There are ragged bits of metal decking, and some bollards are clearly visible on the edges of the wreckage.
A fat peanut worm
Anemone on a piece of hull
Stripy anemone in the wreckage
Blacktail seabream schooling above the wreck
Silvertip nudibranch
Octopus under the hull plates
Very well-camouflaged speckled klipfish
There is a lot to see here – beautiful invertebrate life – abalone, mussels, sea cucumbers, nudibranchs, worms – schools of fish (we saw blacktail seabream), shysharks, and of course the pleasure of swimming the length of a shipwreck! There are also ridges of sandstone to explore, and kelp covers parts of the wreck. Particularly around the engine block, the growth is very dense.
Bollards on the hull
This is a good site for night dives, and seals are often spotted here which is very entertaining. The entry and exit can be a bit of hard work, but it’s well worth it and the depth (maximim 9 metres at high tide) makes it very suitable for training dives.
Kate with the buoy line in top to bottom visibility
Great white sharks move fast when making a kill. If you’ve watched Air Jaws, or the BBC Blue Planet series, or visited Seal Island, you know this. Wired featured an article on filming animal kills for nature documentaries, and great whites came under the spotlight.
It requires some expensive equipment, some ingenuity (think bicycle wheel…) and a lot of time and patience to get even a few seconds of decent footage. Wildlife filmmaking isn’t for instant gratification seekers!
So, you have just qualified as an Open Water diver. Congratulations, the world’s oceans are there for you to explore. An often asked question is:
What’s next?
Advanced. One word, and that is often what you will get from anyone, including your instructor.
However, a good instructor will sit you down and try and find out a little more about where you think you might go with your diving. At this point it is unlikely you will know: will wrecks be your thing? Underwater photography? Exploring little-known dive sites?
Many an instructor will tell you that whilst doing your Advanced course you will come to realise what you will like best. This is hardly likely. Will one dive on a wreck be convincing enough? Will one dive with a camera have you rushing out to buy R20,000 worth of underwater photography equipment?
What if you decide photography is your thing… Do you choose to do three photography dives as part of your Advanced course? Can you? Do you even need to do an Advanced course if you love underwater photography? Or perhaps deep diving is what your heart desires. Will your Instructor take you on four deep dives for your Advanced course?
There are a multitude of questions and the answers are not always clear until you have done some diving. The whole idea with the Advanced course is to do the two core dives – navigation and deep – and three adventure dives, in the hope one of the three will entice you to do the corresponding Specialty.
It often does, and sadly this is likely to be where a diver stops exploring the opportunities available. A diver does a photography dive, rushes off to buy a camera, and this becomes his main focus. Don’t get me wrong – there is nothing wrong with this – but what you do is limit yourself if you choose this path.
Often a new diver will decide Divemaster is the goal, so they do Advanced, Rescue and Divemaster. In as little as two months you have achieved this status, have done 60 dives and are now ready to go and work and earn an income for doing what you love. Sounds great, and it is, but are you ready for everything?
You land the dream Divemaster job in a tropical location – awesome! The first day you get to take a group of 12 on a night dive. Hmm, oh yes, you did do one during your Divemaster training, or perhaps two, or maybe not… Can you safely say you are ready to take 12 strangers on an underwater exploration at night when you have no experience?
Day two the group want to explore a deep reef, so off you go with twelve strangers to a depth of 30 metres. You did one deep dive for Advanced, possibly a few during Divemaster – are you ready? The next day you take 12 strangers to a site with a raging current. Have you done drift diving? It is an amazing experience when everyone drifts along with you but have a few stragglers, a few who swim against the current and suddenly your group of 12 are scattered all over the ocean.
Yes, you are a qualified Divemaster, but it could be you have little or no experience in drift diving, night diving, wreck diving and everyone’s favourite, deep diving. Sure there are Divemasters with all of this experience, but they are few and far between. Some Divemasters have never dived with a camera, and they get frustrated when the have a group of photographers to lead who are content to move no more than 20 metres from the entry point because there is so much to photograph.
So the question again, “Whats next?”
You should dive, as much as you can. If you want to combine this with furthering your diving qualifications, that’s great, but you don’t have to. I dived as an Open Water diver for 18 years, and didn’t feel as though I was missing out on anything. Plus, after all that time in the water, I was a capable and confident diver already when I started to do more dive courses.
Local diving varies from city to city and country to country. Depending on where you plan on doing the majority of your dives, have your instructor advise you on the best, but many different, options. In any event, to build on your capabilities underwater try and choose a path that will cover a wide range of diving environments and give you some solid experience.
My opinion is do more than one of your Advanced dives using a compass, so you are comfortable with how they work. Many of Cape Town’s dive sites are shore entries and being a good navigator eliminates long surface swims.
Also, do more than one dive to a depth greater than 18 metres. You are going to be qualified to dive to 30 metres after the Advanced course, so be sure you are comfortable being at 30 metres.
If you decide to do Specialties but are unsure of which, consider where you will dive. For example in Cape Town I would suggest you do a Deep Specialty and have your instructor conduct some of the dives on wrecks. This will get you to a point where you are comfortable with greater depths (Deep Specialty will qualify you to 40 metres). If wreck diving is your passion a Wreck Specialty is a must, as is Enriched Air diving as this extends your bottom time, a valuable commodity at most of the wrecks in and around Cape Town.
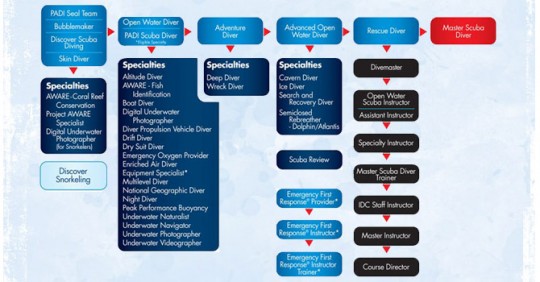
PADI course flowchart
These are just a few of the options, so dust off the Open Water manual and see just how many different routes there are. Choose wisely! And remember to dive as much as possible.
I wrote a review of my Sony DSC-TX5 with its MPK-THJ marine housing in October, after our trip to Sodwana. At that stage I’d had an opportunity to take the camera on a number of dives, both deep and shallow, in various conditions, but it was still quite new.
Sony Cybershot DSC-TX5
I’ve had the camera for a bit longer now, and taken several thousand photographs on a large number of dives. It’s still giving me a great deal of enjoyment. I complained in my review that you can’t turn off the auto-preview after taking a photo, but I’ve adapted to that and gotten used to not being able to fire off a series of photos at high speed. It requires a bit more patience not to start shooting straight away but to wait until the shot is better composed before hitting the shutter release, but I think it’s good discipline.
Sony MPK-THJ Marine Housing
I am still struggling a bit with the fact that the camera tends to let in too much light when I point it at a white subject in shallow water – I’ve taken a LOT of photos of orange clubbed nudibranchs at Long Beach, and there’s probably only one that’s satisfactory. I’ve tried angling the camera down, but no luck yet.
I don’t use the 4x optical zoom as much as I expected I would – I tend to zoom with my feet, because the camera focuses quicker that way. The 10MP capability is fantastic – Tony and I have been able to zoom into areas of the photos afterwards and see a huge amount of detail – the shyshark copepod parasite, for example.
I was charmed to realise on a very long, shallow dive we did (in Simon’s Town yacht basin) that the intensity of the flash is adjusted based on the amount of light in the water. The hour-long dive, on which I took about 200 photographs, only used one quarter of the camera battery. The battery indicator is misleading, however – the bars are at an angle, and it’s ill-advised to start a dive with only one bar available out of the four, because that last quarter goes very fast.
On deep dives I have struggled to get decent pictures, chiefly through inexperience and ignorance, and my biggest frustration has been being able to see the entire wreck in front of me but not being able to persuade my camera that there’s something there worth focusing on. On our last deep dive, to theSAS Good Hope, I finally managed to take a few photos worth writing home about, but they were all from close up while I was keeping very, very still.
The flash, like all camera flashes, is both a blessing and a curse. On low-visibility and deep dives, backscatter is a problem, but keeping very still and shooting from close-up, minimising the amount of gunk in the water between me and the subject, also seem to work wonders.
Tony has laughed uproariously as I’ve gone through a litany of newbie mistakes – forgetting to slide the lens cover down before putting the camera in the housing, and then only switching it on for the first time when I’m 20 metres underwater… Starting a dive on low battery when I have a spare battery in the car and it would be a cinch to change it… Not checking that I have battery life left before getting on the boat or into the water… You name it, I’ve done it. It’s made me a bit paranoid, which I suppose is necessary if one wants to be ready at all times!
I haven’t had any problems with the housing flooding, although sometimes I open it and there are droplets on the clip. It’s hard to tell if these are there because I was impatient and opened the camera when the housing was still wet (usually the case!) or whether they’re an actual leak. Whatever the case, the camera has never been wet when I’ve opened the housing. I also haven’t tested its capability to be used in shallow water without the housing, and have no intention of doing so – unless by accident.
Just a note: unless I mention otherwise, the still photos on the blog are taken by me with the DSC-TX5. The videos and stills from the videos are taken by Tony using his Bonica Snapper 1080P Dive HDDV.
Here’s a video clip from a night dive we did in June this year at Long Beach. Look out for the box jelly with one tentacle, a klipfish, the beaked sandfish digging themselves into the sand, two warty pleurobranchs, an octopus hiding under a piece of plywood, a cuttlefish under the wreck, a two tone fingerfin, and a little jutjaw (we think).
This is an early night effort taken on my Sea&Sea camera with torches instead of a strobe. The resulting hotspots are eliminated when using the Bonica Snapper, provided the light is positioned appropriately.
Following on from my review of the Bonica Snapper underwater video camera, here are a few pictures to show the camera, the housing and the component parts.
Camera inside silicone skinOpen housing with the orange filter attachedTop view of the sealed housing, filter and wide angle lens fittingApplying the wide angle lensCover I constructed to reduce glare on the viewfinderBonica strobe - front viewSide view of the Bonica strobe showing dimmer switch
Tami, Kate and I are busy with the PADI Wreck Specialty course. It involves four wreck dives, and a theory component. You don’t need to be an Advanced diver to do the course – though all three of us are – but an Adventure Diver qualification is sufficient.
(The Adventure Diver qualification is like Advanced-lite: instead of five adventure dives, you only do three. Also, you can credit each adventure dive towards the first dive of the corresponding specialty course.)
The theory component is simple: there’s a short (50 page) manual that covers safety aspects of wreck diving as well as some of the historical and (marine) biological considerations that should be borne in mind when exploring wrecks. I was particularly struck by the section pointing out that some wrecks are war graves or the final resting place (like Titanic) of many civilian souls, and should thus be treated with the same respect as you would a grave in a cemetery.
The manual is also very clear and forceful on the subject of wreck penetration, an activity that seems terrifying to me. You need the correct equipment, and (as Peter Southwood says repeatedly on his Wikivoyage pages) if you don’t know what that is, you’re not qualified to enter a wreck! Also, there are particular techniques required to handle that equipment: you need to know how to manage a reel, belaying it correctly, as well as how to handle yourself in case of entrapment, entanglement, or disorientation. Added to all this, many wrecks are unstable and all of them are in a state of decay… Locally, the SAS Transvaal, SAS Pietermaritzburg and BOS 400 come to mind (the latter collapsed during a storm this past winter, and is now in a radically different orientation).
Four wreck dives are required to complete the course. This past weekend we did two: a deep dive on the MV Rockeater, a fantastic former diamond driller in Smitswinkel Bay, and a dive on the SAS Pietermaritzburg.
Dive 1: MV Rockeater
The MV Rockeater is the oldest of the Smitswinkel Bay wrecks – it’s been down there since 1972. The ship has a lot of interesting bits and pieces sticking up off it, as well as a collapsed helicopter pad and a drilling derrick that is lying on the sand next to it. It’s 65 metres long and very, very lively. We saw a sleeping pyjama catshark in the wreck, as well as nudibranchs, lots of fish, and the most beautiful sea fans. Space cadet here didn’t lower her camera’s lens cover before putting it in the housing, and didn’t check that everything was in order with the camera while still on the boat… So at 20 metres when I switched it on, it told me to “lower the lens cover in order to shoot”… Opening the housing to do so was not an option! So I just had to look, no pictures.
Our project on this dive was to determine which way the current was flowing, and then swim from the shot line down the wreck into the current. We’d do this to 1/4 of our air, and then turn around and swim back with the current.
Dive 2: SAS Pietermaritzburg
Wreckage of the SAS Pietermaritzburg
The SAS Pietermaritzburg is a more recent scuttling (1994) but lies in a very exposed spot just off the Miller’s Point slipway. It has a fascinating history – before being purchased and renamed by the South African government, it took place as the lead minesweeper in the D Day invasion of Normandy. And now it’s lying 1 kilometre from Miller’s Point!
SAS Pietermaritzburg
The visibility wasn’t great (apparently fairly standard for this site), but it’s a fantastic wreck. Maximum depth (on the sand) is about 22 metres, so you can have a nice long dive in relative comfort. The wreck has all sorts of cool places to look inside, a ladder up to the deck, and for the brave (or foolhardy), some swimthroughs under the hull.
Structure on the SAS Pietermaritzburg
It was nudibranch paradise… Instead of giving my full attention to the mapping project we’d been set (drawing the wreck including estimates of width and length, the compass direction in which it’s lying, and depths on the deck and sand), I was taking National Geographic quality photos of those gorgeous sea slugs.Fortunately Kate’s map was good enough for both of us!
SAS Pietermaritzburg
Tony was doing dive 4 with Cindy, an Open Water student, so Gerard, Kate, Tami (once she found us!) and I cruised the wreck investigating all the awesome features. We will definitely be diving this wreck a lot more in the future.
Life on the SAS Pietermaritzburg
Weather permitting, we’ll do the second and third dives for the Wreck specialty next weekend or the weekend after that.