Dive gear maintenance: Masks

Masks tend to fog up due to some form of contaminant on the glass. You are told when you buy a new mask to give it a toothpaste treatment, or “burn it gently with a lighter.” These theories have dubious origins and the reality is that the glass is dirty: silicones from manufacture, sunscreen, and natural body fluids all make the glass oily.

The Number Two cat has some opinions about dive mask maintenance

The trick is to wash the mask with warm soapy water. End of story, a clean piece of glass will not fog up. Baby shampoo is often recommended due to the fact that if you leave a residue in the mask it wont burn your eyes, but after years and years of experimenting and testing all the different suggestions I can assure you warm soapy water works like a charm.

I wash everything with Bio-Classic (an enzyme-based washing powder that is great for cleaning off body fluids) and this includes all my masks. I rinse them well after washing and store them in a plastic container.

Clean air: all about compressor maintenance

Diving, in my opinion, is one of the most rewarding sports on the planet. Breathing underwater, interacting with the myriad of creatures you can and do always encounter and the total tranquilty below the surface cannot be achieved easily in any other sport. If it is an adrenaline rush you need, diving can give you this too. Having raced cars, bikes and go-karts I know what an adrenaline rush does for you, but believe me an encounter with a whale shark, a pod of dolphins, a tiger shark, hammerheads or a great white shark give you a rush unlike anything else, so diving gives you the best of everything.

As with any sport or recreational activity diving has a few inherent risks. Besides regular maintenance of your gear, the air you breathe underwater must be clean and pure. A cylinder filled with contaminated air will harm you quickly and quietly. Unless you test each and every cylinder you breathe from with a sophisticated analyser for air quality you have no idea of how good your air is.

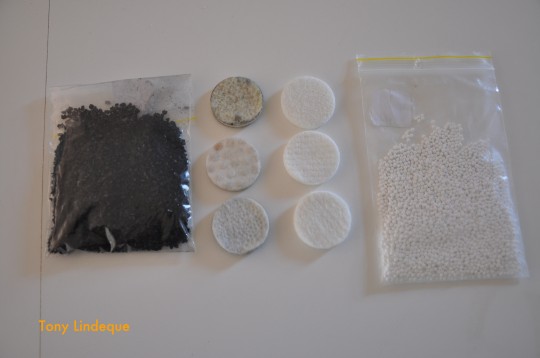
Charcoal, used felt pads, new pads, and drying agent

All dive centres have a strict policy on compressor maintenance and filter changes or services but occasionally you will have a fill from an operator who is not that scrupulous. You may also have a fill from a privately owned dive compressor and again the same regulations regarding maintenance apply. If you are unsure, ask the compressor operator for his certification card and the compressor service records. This is your right, it is you that is going to breathe that air. A rule of thumb for me is that if the owner dives and breathes that air then it is most likely safe, but if the owner is seldom breathing from the cylinders he supplies then there may be a risk.

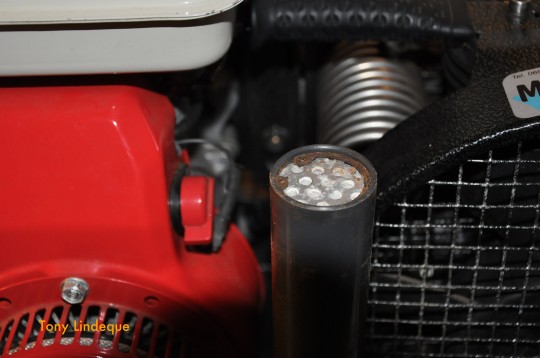
Components (felt pads etc) from inside the filter tower

I often fill my own cylinders, for my students, divers and myself. I am a stickler for the quality of the air I want in my cylinders so I am careful of the places I will fill my cylinders and just as careful of the quality of the air I pump. Our compressor has a service interval of 15 hours and this is what is involved.

The filter tower is made up of a few components. Felt pads between the water separator, charcoal and drying agent. The filter tower also has a bleed valve and bleeding the moisture off every few minutes helps in reducing the moisture the filter must remove. The compressed air passes through the water separator, a felt pad, a drying agent, another felt pad, charcoal, and finally another felt pad before it enters the cylinder. This ensures dry clean air is pumped into the dive cylinder.

Water separator inside the bottom of the filter tower

There are other considerations.

Air intake
Air intake

The intake of air to the compressor needs to be clean so a particle filter on the intake pipe is important as is the location of this filter This prevents bugs, sand , dust and paper entering the compressor. The compressor we have has a petrol engine and the exhaust fumes must be kept away from the intake so it is important to position the intake upwind of the motor.

The top of the filter tower

The compressor runs on a synthetic oil that must be changed as often as the filter contents and the Honda engine also has service requirements. Spark plug change after 30 hours, air intake every 15 hours and an engine oil change every 15 hours. The whip or filling hose needs a cap to keep the threads clean and the opening free from contaminants.

A record of the fills done must be maintained and the correct procedure followed. This includes recording the last viz date, owners detail, ending pressure and blend if it is a Nitrox cylinder.

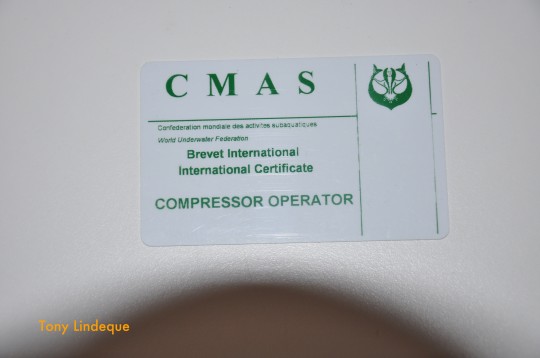
Finally, to operate a compressor requires a certification and in South Africa this must be a course approved by the department of manpower. The CMAS compressor operator course offered by False Bay Underwater Club fullfils these requirements.

CMAS Compressor Operator certification card

Top up my cylinder… and win a repeat customer

Your day’s diving is only over once you are home, equipment rinsed, dried and stored and your cylinders are full. If you own your own gear and live on a coastline like we have in Cape Town then diving is a very cheap sport or hobby. You only expense, other than the trip there and back, would be to fill your cylinders.

Popular cylinders are 10 litre and 12 litre cylinders and if you dived at one of the multitude of easy shore entries around the Cape Peninsula where depths vary from 3 m to 12 metres you can quite easily end up with 100 bar in your cylinder at the end of a 50 minute dive.

If you dived at home in your pool to test your gear or work on buoyancy you would likely have 150 bar after more than an hour in the water. The same cylinder on a 30 metre deep dive for a total dive time of 30-40 minutes including safety stops would be at around 50 bar if you followed your dive plan.

The whole thing is that if you arrived at a dive centre, with a tiny 7 litre cylinder that needs 50 bar (350 litres of air) or a huge 18 litre at 50 bar – requiring about 3000 litres of air to fill to 220 bar – most, but not all dive centres will charge the same flat fee for filling. I understand that everyone has their own business plan and set of procedures but in reality this does not bode well for customer retention

A dive centre that is quick at filling, or that charges less if you only have a “top up” will foster good relations with customers, and if you are happy in their space you will probably buy from that shop

The dive centre that is slow, or charges you full price in fact forces you away as you now go to a different centre to fill, and ultimately make other purchases there too. I drive past three dive centres on most diving days to end up at centre number 4 to fill my cylinders, why? Dive centre 4 is friendly (so are the others), but if I need a top up that’s what I pay for. The staff will always talk diving and show you the latest gadgets, and this fosters good relationships and this is where I shop.

As a diver with your own gear you will always attend to any faults with haste otherwise they spoil the diving experience. As an independent instructor I have eight sets of gear. The gear works harder than the average diver’s gear so a fair amount of maintenance is required. Almost weekly something needs to be fixed: reels wear out, torches get dropped, gloves become holed, fin straps break and the list goes on. Students need everything to work properly if they are to have a good experience so this constant expenditure is necessary.

Where do I buy all of these consumables? Often at the same centre that fills my cylinders. It’s the same place you will go when you need an expensive item such as a new BCD, a download cable for a dive computer, and it is most likely the place you will drop off your regulators for service when the time comes. It is also the place you will buy a bargain from as being a regular customer means the centre knows how you think, the type of stuff you most often buy, and what you do, so when a bargain arrives that they know is just what you need they will do their best to put you and the item in the same area, and hey presto they have a sale…

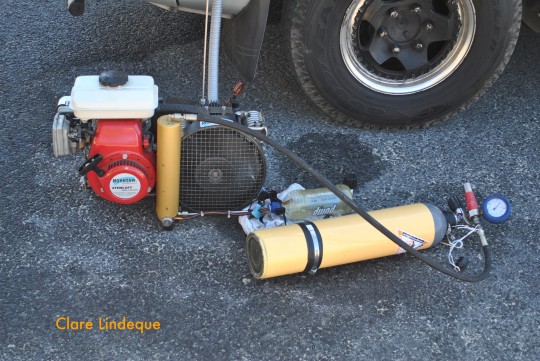
Like this one!

Baby air compressor
Baby air compressor

But more on the new compressor in another post…

Dive gear maintenance: BCDs

Dive gear is expensive but looked after correctly it will give you many years of service. You are reliant on this equipment at depth and ensuring it is always in excellent condition means you never need to fear an equipment failure will spoil your dive.

BCD

When you buy a BCD make sure it is the right size. Too often a salesperson will tell you if it is a bit loose over your T-shirt it’s okay as a wetsuit is thicker… Don’t fall for that, your 7 millimetre wetsuit is not much thicker than 2 millimetres at 40 metres and an ill-fitting BCD at depth is not pleasant. The other important factor is that you may end up diving in the tropics, half naked, and a snug BCD is important.

Make sure you have tried a rental rear inflation as well as a side inflation before you buy. If you don’t know the difference, try it before you buy it. Side inflation BCDs with pockets are popular with training schools (instructors can pop weights in students’ pockets if they are too buoyant). It is a rugged style of BCD and it’s cheaper than most integrated weight BCDs.

Weighing a BCD in the garden

Another important factor is the weight. If you will travel often with your gear consider a lightweight travel BCD as some BCD’s can weigh as much as 3-4 kilograms.

Cleaning

Rinse your BCD in the bath in warm water. Very often you will find there is water inside the bladder of your BCD. This happens when you hold the deflate button long after it is empty on your descent. Fill the bladder with a few liters of warm water by holding the BCD down in the bath and holding the deflate button. Then give it a good shake to swirl the water around and dissolve salt crystals (warm water dissolves salt quicker than cold water).

Flushing water from inside the BCD

Invert the BCD and allow at least half of the water to run out by depressing the inflate button. This ensures the small valve and tiny opening on the inflation side is flushed. (Do this often and you will never have a sticky inflator.)

Drain the last water by depressing the deflate button, then orally inflate the BCD, drain it again, inflate it again and hang it up to dry, in the shade. Clip all the clips – a closed clip is less likely to break. Extend the straps so they are not folded over in the same spot constantly.

Dive gear maintenance: Knives

Dive knives come in a range of sizes, shapes and qualities. They often have the words “stainless steel” engraved on the shaft but this more often means “a bit of stainless steel and a lot of good old steel”, the type that rusts quickly.

The more you pay for a knife the higher the quality of the stainless steel and the less likely it is to rust. I have never owned a particularly expensive dive knife so I am well versed in the speed at which the “el cheapo” knives rust. Bear in mind that the more expensive your knife, the more likely you are to take stupid chances – under the influence of nitrogen narcosis – to retrieve it if you drop it while diving… Cheap knives have their advantages!

Rusty dive knives
Rusty dive knives

With a new knife, I start off by washing the knife in very hot water, dry it well and then paint the metal with clear nail varnish. This lasts well and will only need a repaint if you use the knife to actually cut something (imagine that!).

Freshly nail-polished knives

It does help to remove the knife from its sheath and rinse it after every dive, but eventually it will develop some rust. You can gently sand this off, and then repeat the nail polish treatment.

FAQ: How do I clean a stinky wetsuit?

Maybe your wetsuit smells funky because you perspired in it. Maybe there are other reasons… Whatever the cause, here are some tips for keeping it fresh and fragrant.

Give it a hot rinse

This is the most important part of regular pong prevention. Don’t waste your time dipping the suit into a communal rinsing tank at the dive centre. Unless you get there first, that water is full of contaminants…salt, body fluids and sand. The easiest way to do this is to take your suit in the shower with you, otherwise lay it down flat in the bath and give it a good once-over with the shower head. Hot water is better than cool water for breaking down the mineral salts from the ocean and your body.

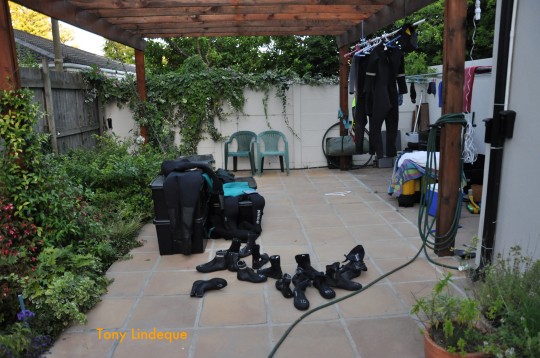
Our garden after a day of diving

Hang it in the shade

After rinsing, hang your suit to dry on a thick wooden or plastic hanger, preferably one specially made for wetsuits. You can tape two normal plastic hangers together to make a (much cheaper) good solution. Try to keep the front and back of the suit apart so it can dry more quickly. Even a length of plastic piping pushed through the arms of the suit to make them stand out helps a lot with drying. (Plus, it makes the suit look like someone is in it, which scares away burglars and pigeons when it’s hanging outside!) Air circulation is key. Avoid direct sunlight, it will dry faster but will be stiff and hard to get on the next time you try.

Soap the suit

Every once in a while give your suit a shampoo. Scrub it well inside and out, using a sponge on the neoprene and a soft brush on any nylon or plushy linings. Almost any kind of soap will work to reduce the smell, but some are better than others. The best soaps for the job are “wetsuit shampoos” (check your local dive store) or a gentle baby shampoo like Johnson’s. Next best are regular bath soaps and shampoos.

I also use the cheapest, smelliest shampoos and bubble baths that I can find. Examples are Colgate shampoo and those 1.5 litre bottles of luridly coloured bubble bath that cost almost nothing. The cheaper it is, the stronger the smell, it seems! Dish and laundry soaps (like the green Sunlight laundry bars) are too harsh to use regularly on your wetsuit, but will do the job in an emergency. Don’t ever have your wetsuit dry cleaned (unless you want to destroy it)!

Clare and I occasionally put our suits through the washing machine – on the coolest temperature setting (it’s 30 degrees celcius on our Bosch), with mild organic laundry detergent (Pick n Pay and Woolworths have good in-house brands) and some baby fabric softener for smell (Sta-Soft has a good baby-safe fabric softener fragrance that is very mild and smells great). Turn off the spin cycle and let the suits air dry out of the sun. Just be careful when you open the drum – there will still be water inside if you didn’t spin the wetsuits, and arms and legs tend to trap gallons of liquid!

We also use laundry detergent to wash the suits by hand in my plastic tubs in the garden – the best seems to be something with enzymes in that will clean off the biological waste (you know what I’m talking about) inside the suit. Woolite, which works like a charm, has been discontinued (at least in Pick n Pay in South Africa) but something like Bio-Classic, added to the washing water and foamed by hand, also seems to work quite well. Purpose-made wetsuit shampoo will be your very best option for a long term solution – there are quite a few available.

Of course, all of this applies to booties too, which can develop an unearthly smell quite of their own accord. A good soak after rinsing in some Dettol or Savlon helps to keep bacteria at bay. Once dried I silcone the zips. I put talcum powder (the smellier the better) inside all my pairs now and then to keep them fresh. The only problem is that you may resemble a cocaine smuggler the first time you put them on after powdering. But your dive buddy won’t mind!

Out of air!

Out of air emergencies should not happen. Diving safely includes being sure that you have checked everything yourself, doing a buddy check and diving within your own personal limits. Always avoid making too many changes to your gear configuration and don’t test more than one new item at a time unless you are in shallow, confined water.

Most incidents are a culmination of several small mishaps and would most likely not have occurred had just one error being omitted. The other issue to be aware of is trusting your training and avoid thinking you know better. Here’s why…

I was diving in Mozambique, did a backward roll, and a negative entry (that’s when you don’t hang around on the surface with an inflated BCD, but start your descent immediately). Now, doing negative entries is not ideal, but the surface current was strong, we were diving a small reef and I wanted to get down quickly. So after the roll I finned down head first as fast as I could, without a buddy… Mistakes number one and two.

At 18 meters I found breathing to be difficult. Having just over-exerted myself I stopped to catch my breath but found as I reached the end of my breath my regulator stopped giving me air. Slow breaths were okay but it would not deliver what I needed. I instinctively looked at my pressure gauge, plenty of air in the cylinder but the needle dropped off as I took a deep breath.

“AHA my cylinder is not all the way open,” I thought so I reached up to try and check. It felt open, but convinced I was not doing it properly I took my kit off, held it in front of me and checked. The cylinder was all the way open, and now suddenly I was not getting air at all. I swam to the surface, slowing at about 8 metres to grab a few breaths from a buddy pair descending slowly.

On the surface I signaled the boat and whilst remaining in the water had the top man change my regulators – mistake number three. Straight back down to 18 metres I went, breathing normally and as soon as I turned face down to scan the sea for the group I ran out of air again. Back to the surface as fast as possible! A CESA from 18 metres is relatively difficult once you are stressed and short of breath from over exertion.

On the second descent logic was telling me the problem had to be my cylinder, but arguing with myself I dismissed this as I had serviced my cylinder less than three months prior to this and felt it could not possibly be at fault.

Back in camp I stripped my pillar valve and found it to be blocked with rust and sand. How could this be?

After investigating it turns out the cylinder was dropped from a vehicle a few weeks before this by the compressor operator. The pillar valve was damaged, so they drained it in a hurry, causing condensation, dropped it again in the sand, rinsed it with the water used for cooling cylinders whilst filling (salty water), emptied the water out, replaced the pillar valve with a used one, without a snorkel (a small pipe that runs from the bottom of the pillar valve into the cylinder). I got it back full of air unaware of the incident. The salty water inside rusted the cylinder, the absence of a snorkel meant that every time I was pointed head down the scales inside slowly drifted into the pillar valve until it was totally blocked.

It is not unusual for a little spot of rust to develop in a cylinder. It’s not ideal but it won’t kill you. However a snorkel ensures the pillar valve is supplied with clean air and the scales are kept out – in my situation in Mozambique, the scales would have settled around the top of the snorkel where it attaches to the pillar valve, instead of blocking the valve completely. The other end of the snorkel would have been a bit further into the cylinder, drawing clean air. When I took my cylinders to Orca Industries recently for their annual maintenance, I was very impressed that they insisted on checking each one for snorkels, and fitting them if they were absent.